No edit summary |
|||
| Line 56: | Line 56: | ||
==Tactical Application== |
==Tactical Application== |
||
| + | Assembly Walkers typically serve as the main assault walker due to their superior durability over their [[Habitat Walker|infantry producing counterpart]], wider selection of weapon hardpoints, and its access to repair. Like the Habitat Walker, the Assembly walker is able to produce units for escort and attack as well as trample most objects under their legs. <br /> |
||
| − | [[Image:Uniatwar_02.jpg|left|thumb|300px|A Beta-version Assembly Walker]] |
||
| − | Assembly Walkers typically serve as the main choice for an assault walker due to its superior durability and firepower compared to its [[Habitat Walker|infantry producing counterpart]]. Like the Habitat Walker, the Assembly walker is able to produce units for escort and attack as well as trample anything short of another walker, a command center structure, heroes, or [[Peacebringer]]s. Assembly walkers are also required for both Repair Chamber Hardpoints and [[saucer]]s, meaning a Hierarchy force without one is incapable of repairing their walkers or structures. The Assembly walker also requires all 3 crown hardpoints, the attached 2 arms and 1 front panel, as well as 2 shield generators and its core to be destroyed, a total of '''9''' pieces of hardware to take down the walker, compared to the '''6''' (2 hardpoints, 2 crown panels, 2 coolant nodes) required to destroy a Habitat Walker. The most common usage of the Assembly Walker is to send it escorted by saucers, which is under most circumstances the most cost-effective strategy unless the map contains a high number of instant-grab resources.<br /> |
||
| + | Hierarchy Mirrior matches are generally dominated by Assembly Walkers, as all of their units are capable against enemy walkers and the weapon hardpoints unlocked by the Assault branch are also excellent in walker-to-walker engadgements. Against Masari, the Assembly Walker is not quite as effective in the early game due to the Masari [[Disciple]] being a very cost-efficent counter to the expensive vehicles produced by the Assembly Walker. |
||
| − | The Assembly Walker's disadvantages compared to the Habitat Walker are that it takes longer for its Glyph to be carved and scanned, has 1 fewer crown hardpoint, and produces units that are by far more costly than those of the Habitat Walker. |
||
| + | While potent, the Assembly Walker does take longer than the Habitat Walker for its Glyph to be carved and scanned and the units it produces are generally twice the cost of those produced by the Habitat Walker (baring research-locked units). The Assembly Walker also has one fewer crown socket which means it sacrificers some of its potential offensive power to attach production pods or additional turrets.<br /> |
||
| − | Like the Habitat Walker, the Assembly Walker is also extremely slow, even compared to the rest of the Hierarchy's units.<br /> |
||
==Units Produced== |
==Units Produced== |
||
| Line 73: | Line 72: | ||
| − | === |
+ | ===Internal Hardpoints=== |
| − | '''Assembly Walker Core'''<br /> |
+ | * '''Assembly Walker Core'''<br /> |
''Effect'': Destruction of this results in destruction of the '''Assembly Walker'''<br /> |
''Effect'': Destruction of this results in destruction of the '''Assembly Walker'''<br /> |
||
''Prerequisites'': Destruction of front panel socket<br /> |
''Prerequisites'': Destruction of front panel socket<br /> |
||
| Line 84: | Line 83: | ||
| − | '''Shield Generator Right/Left'''<br /> |
+ | * '''Shield Generator Right/Left'''<br /> |
''Effect'': Prevents damage to '''Assembly Walker Core''' until both are destroyed<br /> |
''Effect'': Prevents damage to '''Assembly Walker Core''' until both are destroyed<br /> |
||
''Prerequisites'': Destruction of right arm and left arm sockets<br /> |
''Prerequisites'': Destruction of right arm and left arm sockets<br /> |
||
| Line 93: | Line 92: | ||
===Crown/Arm hardpoints=== |
===Crown/Arm hardpoints=== |
||
| − | '''Defiler Pod'''<br /> |
+ | * '''Defiler Pod'''<br /> [[Image:WalkerDefilerPod.png|right|thumb|85px| Defiler Pod]] |
| − | ''Effect'': Allows production of [[Defiler]]<br /> |
+ | ''Effect'': Allows production of [[Defiler]]s.<br /> |
''Prerequisites'': None<br /> |
''Prerequisites'': None<br /> |
||
''Cost'': 500<br /> |
''Cost'': 500<br /> |
||
| Line 102: | Line 101: | ||
| − | '''Phase Tank Pod'''<br /> |
+ | * '''Phase Tank Pod'''<br /> |
| − | ''Effect'': Allows production of [[Phase Tank]]<br /> |
+ | ''Effect'': Allows production of [[Phase Tank]]s.<br /> [[Image:WalkerTankPod.png|right|thumb|85px| Phase Tank Pod]] |
''Prerequisites'': Research '''Quantum Branch Suite 2'''<br /> |
''Prerequisites'': Research '''Quantum Branch Suite 2'''<br /> |
||
''Cost'': 700<br /> |
''Cost'': 700<br /> |
||
| Line 111: | Line 110: | ||
| − | '''Armor Plating'''<br /> |
+ | * '''Armor Plating'''<br /> [[File: AssemblyHeadArmor.png|thumb|right|65px| Crown Socket Armor]] |
| − | ''Effect'': Covers the hardpoint in |
+ | [[File: AssemblyArmArmor.png|thumb|right|65px| Arm Socket Armor]] ''Effect'': Covers the hardpoint in a durable alloy for added protection.<br /> |
''Prerequisites'': None<br /> |
''Prerequisites'': None<br /> |
||
''Cost'': 700<br /> |
''Cost'': 700<br /> |
||
| Line 120: | Line 119: | ||
| − | '''Range Enhancer'''<br /> |
+ | *'''Range Enhancer'''<br />[[File:WalkerRangeEnhancer.png |thumb|right|85px|Range Enhancer.]] |
| − | ''Effect'': |
+ | ''Effect'': Increases the range of all Walker weapons and abilities by 20% each.<br /> |
''Prerequisites'': Research '''Assault Branch Suite 1'''<br /> |
''Prerequisites'': Research '''Assault Branch Suite 1'''<br /> |
||
''Cost'': 700<br /> |
''Cost'': 700<br /> |
||
| Line 129: | Line 128: | ||
| − | '''Weapon Accelerator'''<br /> |
+ | *'''Weapon Accelerator'''<br />[[File:WalkerAccelerator.png |thumb|right|85px|Weapon Accelerator.]] |
| − | ''Effect'': Reduces reload and recharge times |
+ | ''Effect'': Reduces reload and recharge times of Walker weapons and abilities by 20% each.<br /> |
''Prerequisites'': None<br /> |
''Prerequisites'': None<br /> |
||
''Cost'': 700<br /> |
''Cost'': 700<br /> |
||
| Line 138: | Line 137: | ||
| − | '''Mass Driver'''<br /> |
+ | * '''Mass Driver'''<br /> [[File:MassDriverHP.png | thumb | right | 85px | Mass Driver ]] |
| − | ''Effect'': Adds an inaccurate but powerful |
+ | ''Effect'': Adds an inaccurate but powerful turret that knocks back small targets and cannot be redirected. Highly effective against vehicles and structures. <br /> |
''Prerequisites'': Research '''Assault Branch Suite 3'''<br /> |
''Prerequisites'': Research '''Assault Branch Suite 3'''<br /> |
||
''Cost'': 1,000<br /> |
''Cost'': 1,000<br /> |
||
| Line 147: | Line 146: | ||
| − | '''Beam Cannon'''<br /> |
+ | *'''Beam Cannon'''<br />[[File:BeamCannon.png | thumb | right | 85px | Beam Cannon]] |
| − | ''Effect'': |
+ | ''Effect'': Allows the walker to fire a powerful beam that sweeps the targeted area, dealing massive direct damage to objects touched by the beam and causing secondary explosions along the ground behind the beam.<br /> |
''Prerequisites'': Research '''Assault Branch Suite 4'''<br /> |
''Prerequisites'': Research '''Assault Branch Suite 4'''<br /> |
||
''Cooldown'': 0:40 (from firing)<br /> |
''Cooldown'': 0:40 (from firing)<br /> |
||
| Line 155: | Line 154: | ||
''Health'': 1,000<br /> |
''Health'': 1,000<br /> |
||
''Armor'': Alien Walker Hardpoint<br /> |
''Armor'': Alien Walker Hardpoint<br /> |
||
| − | |||
===Leg Hardpoints=== |
===Leg Hardpoints=== |
||
| − | '''Armor Plating'''<br /> |
+ | *'''Armor Plating'''<br />[[File:AssemblyLegArmor.png |thumb|right|85px|Leg Armor.]] |
| − | ''Effect'': Covers |
+ | ''Effect'': Covers socket with durable alloy for added protection of the socket.<br /> |
''Prerequisites'': None<br /> |
''Prerequisites'': None<br /> |
||
''Cost'': 700<br /> |
''Cost'': 700<br /> |
||
| Line 166: | Line 164: | ||
''Armor'': Alien Walker Hardpoint Armor<br /> |
''Armor'': Alien Walker Hardpoint Armor<br /> |
||
| + | *'''Repair Chamber'''<br />[[File:WalkerRepair.png |thumb|right|85px|Repair Chamber.]] |
||
| − | |||
| ⚫ | |||
| − | '''Repair Chamber'''<br /> |
||
| ⚫ | |||
| − | ''Prerequisites'': None<br /> |
||
''Cost'': 400<br /> |
''Cost'': 400<br /> |
||
''Time'': 0:16<br /> |
''Time'': 0:16<br /> |
||
| Line 175: | Line 171: | ||
''Armor'': Alien Walker Hardpoint<br /> |
''Armor'': Alien Walker Hardpoint<br /> |
||
| + | *'''Cost Optimizer'''<br />[[File:WalkerOptimizer.png |thumb|right|85px|Cost Optimizer.]] |
||
| − | |||
| ⚫ | |||
| − | '''Cost Optimizer'''<br /> |
||
| ⚫ | |||
''Prerequisites'': None<br /> |
''Prerequisites'': None<br /> |
||
''Cost'': 300<br /> |
''Cost'': 300<br /> |
||
| Line 184: | Line 179: | ||
''Armor'': Alien Walker Hardpoint<br /> |
''Armor'': Alien Walker Hardpoint<br /> |
||
| + | *'''Teleport Accelerator'''<br />[[File:WalkerTeleAccelerator.png |thumb|right|85px|Teleport Accellerator.]] |
||
| − | |||
| ⚫ | |||
| − | |||
| − | '''Teleport Accelerator'''<br /> |
||
| ⚫ | |||
''Prerequisites'': None<br /> |
''Prerequisites'': None<br /> |
||
''Cost'': 300<br /> |
''Cost'': 300<br /> |
||
| Line 194: | Line 187: | ||
''Armor'': Alien Walker Hardpoint<br /> |
''Armor'': Alien Walker Hardpoint<br /> |
||
| + | *'''Plasma Turret'''<br /> [[File:Assembly Plasma Cannon HP.png |thumb|right|85px| Plasma Cannon.]] |
||
| − | |||
| ⚫ | |||
| − | '''Plasma Turret'''<br /> |
||
| − | ''Effect'': Adds another anti-ground plasma cannon<br /> |
||
''Prerequisites'': None<br /> |
''Prerequisites'': None<br /> |
||
''Cost'': 800<br /> |
''Cost'': 800<br /> |
||
| Line 207: | Line 199: | ||
''Armor'': Alien Walker Hardpoint<br /> |
''Armor'': Alien Walker Hardpoint<br /> |
||
| + | *'''Arc Turret'''<br />[[File:WalkerArcTurret.png |thumb|right|85px|Arc Turret.]] |
||
| − | |||
| ⚫ | |||
| − | '''Arc Turret'''<br /> |
||
| ⚫ | |||
''Prerequisites'': Research '''Assault Branch Suite 1'''<br /> |
''Prerequisites'': Research '''Assault Branch Suite 1'''<br /> |
||
''Cost'': 800<br /> |
''Cost'': 800<br /> |
||
| Line 257: | Line 248: | ||
==Trivia== |
==Trivia== |
||
| − | [[Image:Assembly_concept.jpg|thumb|left|220px|Assembly Walker concept art]] |
+ | [[Image:Uniatwar_02.jpg|Right|thumb|300px|A Beta-version Assembly Walker]][[Image:Assembly_concept.jpg|thumb|left|220px|Assembly Walker concept art]] |
| − | * |
+ | *The Assembly Walker had a slight change in appearance between the Universe at War Beta and final retail game, making. The "face" teleport dish had it's design changed and the torso also had a minor texture change. These changes appear to have been at the last minute as the original beta model of the Assembly Walker is still seen during the Hierarchy cutscenes and the original model is used for the "ghost" that appears when selected for construction. |
| − | *Its stated ingame that the Assembly walker is |
+ | *Its stated ingame that the Assembly walker is a newer model of walker, explaining it not being seen very often . Before its introduction in Turkmenistan, the Hierarchy instead used transport saucers to deliver vehicle units to battle. |
[[Category: Hierarchy Units]] |
[[Category: Hierarchy Units]] |
||
[[Category:Walkers]] |
[[Category:Walkers]] |
||
Revision as of 23:54, 27 October 2012
- "[...]use Assembly Walkers to build them!" -Nufai
| Assembly Walker | |
 | |
| Affiliation: | The Hierarchy |
| Type: | Land Giant, Mobile Structure, Production Walker |
| Health: | Health depends on condition of death puzzle. |
| Death Puzzle: | Outer Arms + Crown + Hardpoints -> Shield Generator x2 -> Core |
| Armor: | Alien Hardpoint/Alien Hardpoint Armor |
| Movement Type: | Large Walker |
| Speed: | 0.25 |
| Sight Range: | 270 |
| Cost: | 2200RM |
| Time: | 1:10 |
| Popcap: | 1 (Walker Cap) |
| Produced From: | Glyph Carver (Requires Reaper Drone) |
| Special Ability: | Hardpoints, Fire Beam Cannon (requires Beam Cannon hardpoint), Produce Vehicles |
| Weapon: | Plasma Blob, Mass Driver (Requires hardpoint), Electric Arc (requires hardpoint), Plasma Beam Cannon (requires hardpoint) |
| Damage: | Plasma Blob: 50 Mass Driver: Electric Arch: Beam Cannon: |
| Upgrades: | Fast Ordering (Quantum-2), Foo Longitivity (Assault-2), Enhanced Locomoters (Assault 4), Molecular Armor (Quantum-3) Quantum Ordnance (Quantum-3), Volatile Reactors (Mutagen-1), Irradiated Shots (Mutagen-1), Gamma Radiation (Mutagen-3) |
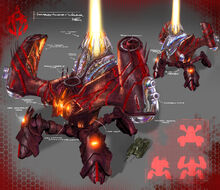
The Assembly Walker is one of the two production walkers for the Hierarchy and replaces both a Vehicle Factory and Aircraft Factory for the faction.
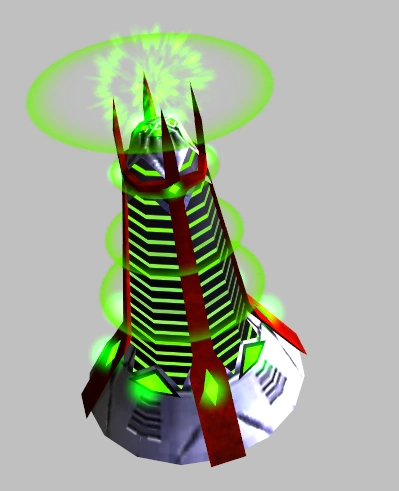
General
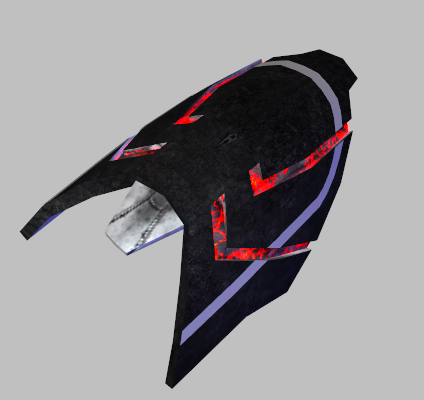
Like the Habitat Walker, the Assembly Walker is a massive, quadrupedal walker armed with plasma cannons and a teleportion system. The Walker's upper body features two large arms on either side of the main body and a giant teleport device on its back. At the front of the Assembly Walker is a large dish-like structure that serves as the exit-point for units to teleport to the ground (or air in the case of Saucers). The Assembly Walker's six anti-ground plasma cannon barrels are mounted around this dish.
Like the other large Hierarchy walkers, the Assembly Walker can crush almost anything in its path and traverse nearly any terrain, including cliffs.
Campaign
The Assembly Walker first appears as part of a large task force sent to destroy a group of human villages in Turkmenistan, conveniently the same place where Novus had been constructing their Home Portal. As soon as the walker arrived, it made its way off towards the Novus base on its rampage. Fortunately, the Novus hero Mirabel was present and her forces managed to destroy the walker before it could reach the Home Portal. Later, a pair of Assembly Walkers outfitted with Beam Cannons and Mass Drivers were encountered guarding a Material Uplink, posing a major hazard for Novus forces, but where destroyed to allow Mirabel to be teleported up to a Hierarchy command ship. Aboard the alien vessel, another Assembly Walker was present within a holding rack, from where it would fire on Mirabel if she passed by. As their final act in the Novus campaign, a pair of the walkers where sent as the first wave against Novus' Middle Eastern base, producing Defilers as they marched closer.
In the Hierarchy campaign, Orlok is only provided with these powerful walkers twice: First during his mission with the Purifier, where one Assembly Walker was being used by Nufai to guard his base, and later during Orlok's rebellion.
During Prince Zessus' escape from a Hierarchy compound, an Assembly walker was called as reinforcements to take out the Masari base that had been set up by the Prince. This walker, curiously, had no leg hardpoints but was outfitted with Mass Drivers and a Beam Cannon.
Tactical Application
Assembly Walkers typically serve as the main assault walker due to their superior durability over their infantry producing counterpart, wider selection of weapon hardpoints, and its access to repair. Like the Habitat Walker, the Assembly walker is able to produce units for escort and attack as well as trample most objects under their legs.
Hierarchy Mirrior matches are generally dominated by Assembly Walkers, as all of their units are capable against enemy walkers and the weapon hardpoints unlocked by the Assault branch are also excellent in walker-to-walker engadgements. Against Masari, the Assembly Walker is not quite as effective in the early game due to the Masari Disciple being a very cost-efficent counter to the expensive vehicles produced by the Assembly Walker.
While potent, the Assembly Walker does take longer than the Habitat Walker for its Glyph to be carved and scanned and the units it produces are generally twice the cost of those produced by the Habitat Walker (baring research-locked units). The Assembly Walker also has one fewer crown socket which means it sacrificers some of its potential offensive power to attach production pods or additional turrets.
Units Produced
Saucer
Defiler (requires Defiler Pod hardpoint)
Phase Tank (requies Phase Tank Pod hardpoint)
Hardpoints
The Assembly Walker has 3 body hardpoint sockets and 4 leg hardpoint sockets. When a leg socket is destroyed, the Walker's speed is reduced. Each existing leg increases the Walker's speed by 10%. Destroying the front panel, left arm, and right arm sockets reveal the Walker's core, left shield generator, and right shield generator respectively. The shield generators must be destroyed before the core may be attacked. When the core is destroyed, the Walker collapses.
Internal Hardpoints
- Assembly Walker Core
Effect: Destruction of this results in destruction of the Assembly Walker
Prerequisites: Destruction of front panel socket
Cost: N/A
Time: N/A
Health: 600
Armor: Alien Walker
Note: Cannot be attacked until shield generators are destroyed
- Shield Generator Right/Left
Effect: Prevents damage to Assembly Walker Core until both are destroyed
Prerequisites: Destruction of right arm and left arm sockets
Cost: N/A
Time: N/A
Health: 350
Armor: Alien Walker Hardpoint
Crown/Arm hardpoints
- Defiler Pod

Defiler Pod

Effect: Allows production of Defilers.
Prerequisites: None
Cost: 500
Time: 0:14
Health: 400
Armor: Alien Walker Hardpoint
- Phase Tank Pod
Effect: Allows production of Phase Tanks.

Phase Tank Pod
Prerequisites: Research Quantum Branch Suite 2
Cost: 700
Time: 0:18
Health: 400
Armor: Alien Walker Hardpoint
- Armor Plating


Crown Socket Armor


Arm Socket Armor
Effect: Covers the hardpoint in a durable alloy for added protection.
Prerequisites: None
Cost: 700
Time: 0:20
Health: 1,000
Armor: Alien Walker Hardpoint Armor
- Range Enhancer
Range Enhancer.
Effect: Increases the range of all Walker weapons and abilities by 20% each.
Prerequisites: Research Assault Branch Suite 1
Cost: 700
Time: 0:20
Health: 700
Armor: Alien Walker Hardpoint
- Weapon Accelerator

Weapon Accelerator.
Effect: Reduces reload and recharge times of Walker weapons and abilities by 20% each.
Prerequisites: None
Cost: 700
Time: 0:20
Health: 700
Armor: Alien Walker Hardpoint
- Mass Driver

Mass Driver

Effect: Adds an inaccurate but powerful turret that knocks back small targets and cannot be redirected. Highly effective against vehicles and structures.
Prerequisites: Research Assault Branch Suite 3
Cost: 1,000
Time: 0:24
Health: 1,000
Armor: Alien Walker Hardpoint
- Beam Cannon

Beam Cannon
Effect: Allows the walker to fire a powerful beam that sweeps the targeted area, dealing massive direct damage to objects touched by the beam and causing secondary explosions along the ground behind the beam.
Prerequisites: Research Assault Branch Suite 4
Cooldown: 0:40 (from firing)
Cost: 1,300
Time: 0:30
Health: 1,000
Armor: Alien Walker Hardpoint
Leg Hardpoints
- Armor Plating

Leg Armor.
Effect: Covers socket with durable alloy for added protection of the socket.
Prerequisites: None
Cost: 700
Time: 0:20
Health: 1,000
Armor: Alien Walker Hardpoint Armor
- Repair Chamber

Repair Chamber.
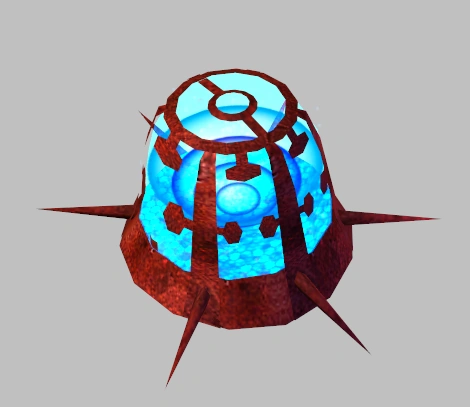
Effect: Generates 3 plasma orbs like those of a Saucer which will conduct repairs on their host Walker. Note: The plasma orbs cannot repair destroyed sockets.
Cost: 400
Time: 0:16
Health: 350
Armor: Alien Walker Hardpoint
- Cost Optimizer

Cost Optimizer.
Effect: Reduces unit resource costs for all units produced by the walker by 8% each.
Prerequisites: None
Cost: 300
Time: 0:15
Health: 250
Armor: Alien Walker Hardpoint
- Teleport Accelerator

Teleport Accellerator.
Effect: Reduces unit build times by 12% each for all units produced by the walker.
Prerequisites: None
Cost: 300
Time: 0:15
Health: 250
Armor: Alien Walker Hardpoint
- Plasma Turret

Plasma Cannon.

Effect: Adds an additional plasma weapon.
Prerequisites: None
Cost: 800
Time: 0:22
Range: 0-280
Damage: 35
Shots per burst: 1
Recharge: 3.0 seconds
Health: 800
Armor: Alien Walker Hardpoint
- Arc Turret

Arc Turret.
Effect: Adds an anti-air electricity weapon.
Prerequisites: Research Assault Branch Suite 1
Cost: 800
Time: 0:20
Damage: 11.4%
Recharge: 3.0 seconds
Health: 800
Armor: Alien Walker Hardpoint
Upgrades
Advanced Mutagens
Effect: Killed organics become Mutant Slaves and last longer
Method: Research Mutagen Branch Suite 3
Fast Ordering
Effect: Glyphs carve 25% faster
Method: Research Quantum Branch Suite 2
Foo Longetivity
Effect: Orbs last longer away from the Repair Chamber
Method: Research Assault Branch Suite 2
Gamma Radiation
Effect: Radiation effects increased by 50%
Method: Research Mutagen Branch Suite 3
Irradiated Shots
Effect: Plasma bolts are irradiated
Method: Research Mutagen Branch Suite 1
Locomotor Enhancement
Effect: Movement, rotation and speed increased by 60%
Method: Research Assault Branch Suite 4
Molecular Armor
Effect: Drastically lowers damage taken by 50%
Method: Research Quantum Branch Suite 3
Quantum Ordnance
Effect: Plasma does 20% more damage
Method: Research Quantum Branch Suite 3
Volatile Reactors
Effect: Creates radioactive cloud when destroyed
Method: Research Mutagen Branch Suite 1
Trivia


A Beta-version Assembly Walker

Assembly Walker concept art
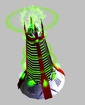
- The Assembly Walker had a slight change in appearance between the Universe at War Beta and final retail game, making. The "face" teleport dish had it's design changed and the torso also had a minor texture change. These changes appear to have been at the last minute as the original beta model of the Assembly Walker is still seen during the Hierarchy cutscenes and the original model is used for the "ghost" that appears when selected for construction.
- Its stated ingame that the Assembly walker is a newer model of walker, explaining it not being seen very often . Before its introduction in Turkmenistan, the Hierarchy instead used transport saucers to deliver vehicle units to battle.